In this post, I explain how I saved thousands of dollars in tiny house costs without making any compromises. You will be pleasantly surprised.
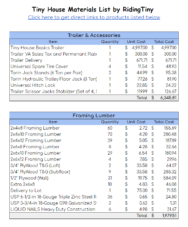
Get our FREE tiny house materials list to help estimate costs of your tiny home.
By entering your email address you agree to receive emails from Riding Tiny. We’ll respect your privacy and you can unsubscribe at any time.
Tiny House Plumbing: The Complete Step-by-Step Guide
- By Sang Kim
- Updated:
Let there be water in your tiny home! In this guide, you will explore tiny home plumbing options and learn how to plumb a tiny house on wheels step-by-step.
Here are some of the questions we will cover in this guide.
- How does tiny house plumbing work?
- What are my tiny house plumbing options?
- How much does it cost to plumb a tiny house?
- What does the tiny house plumbing diagram look like?
Table of Contents
How does tiny house plumbing work?
Whether you plan on living in a tiny home off-grid or stay connected on-grid, you need to bring water into the tiny home by either storing water in the tank or water supplied by a hose.
To simplify, tiny house plumbing works by connecting your tiny house to a water source, then distributing the water via cold and hotlines to the endpoints where water is intended to be used.
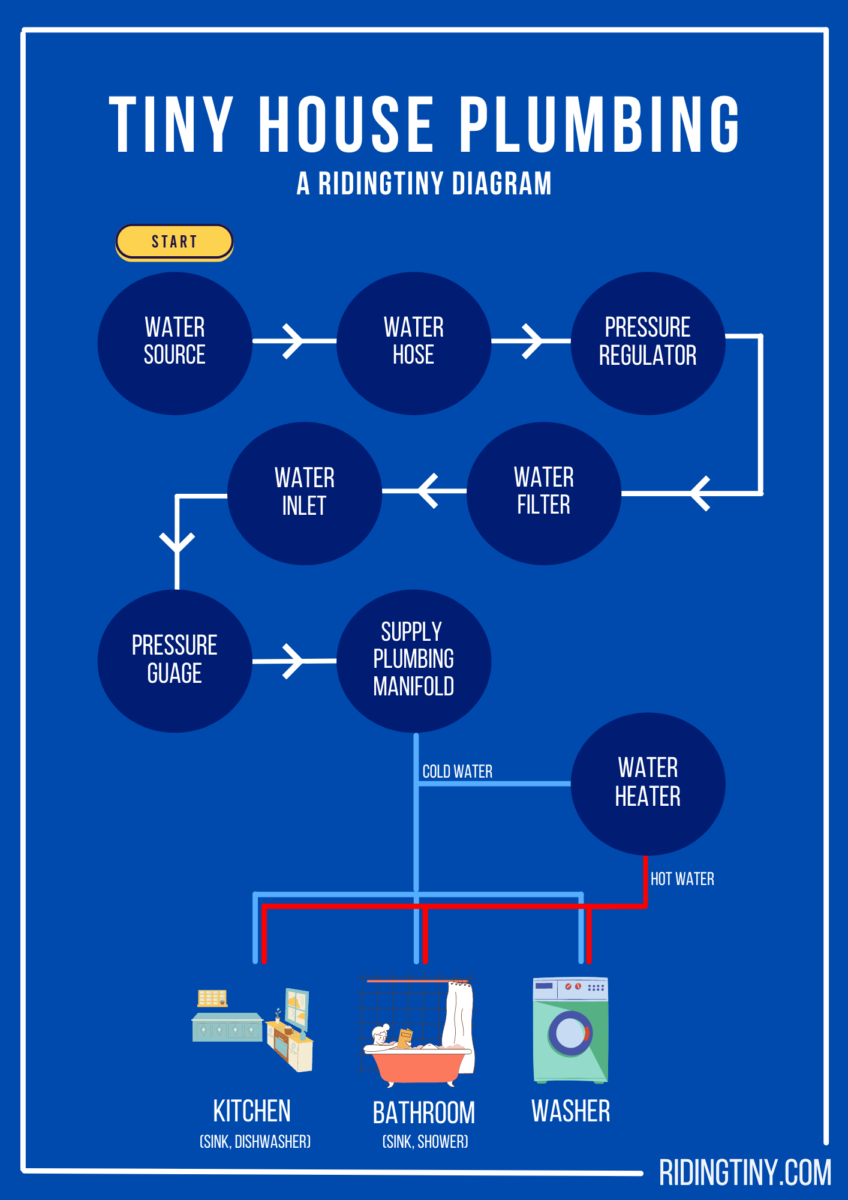
Tiny House Plumbing Diagram
Plumbing a tiny home is surprisingly simple. It is easy as following the flow and using the right fittings to extend the flow from Point A to Point B.
That being said, take a look at the simplified tiny house plumbing diagram:

And that’s it! It’s that simple. But please allow me to elaborate on the diagram a tad more.
Once you bring the water from an outside source into the tiny house via a water hose, you’ll then distribute the cold water supply line to the kitchen sink, bathroom sink, shower, washer, and water heater.
Similarly, you will distribute the hot water from the water heater to the kitchen sink, bathroom sink, shower, and washer.
Tiny House Plumbing Options
There are two ways you can bring water into your tiny home.
- On-Grid Plumbing – Stay connected to city water via water hose (on-grid)
- Off-Grid Plumbing – Store water in a water tank (off-grid)
Both have their pros and cons. Let’s discuss them a bit more.
Tiny House Plumbing On-Grid Plumbing
Connecting your tiny house on-grid simply means you are getting water via a water hose from a permanent water source such as an outdoor faucet or an RV spigot.
Since you can easily connect and disconnect your tiny house from the water source, this is the most popular tiny house plumbing option.
Tiny House Plumbing Off-Grid Plumbing
Off-grid tiny house plumbing is an option for you if you choose to live off-grid and intend to collect and store water in a water tank.
However, storing your own water means you need to make space for the water tank inside your tiny home. Furthermore, off-grid plumbing costs more money than on-grid plumbing because there are more parts and maintenance involved.
Because of these reasons, we encourage future tiny home builders to choose on-grid plumbing option. We chose this option as well and will mainly focus on on-grid tiny house plumbing.
How to Plumb a Tiny House on Wheels
Tiny house plumbing only takes a day or two to finish and skills that you need to learn can be mastered in a few hours.
That being said, here is everything you need to know about plumbing your tiny house on wheels.
Tiny House Plumbing Basics
When plumbing your tiny home, it is completed in two stages: rough plumbing and finish plumbing.
Rough plumbing consists of installing the water inlet, routing water pipes through wall cavities, and connecting the drain pipes together. During this phase, we install and route the pipes to end destinations such as the bathroom sink, kitchen sink, shower, and where water appliances are located.
Finish plumbing refers to the type of work that is done after the rough plumbing and the interior work, such as drywall or interior siding, are completed. During the finish plumbing phase, we connect the supply and drain lines to the plumbing fixtures and appliances.
After the finish plumbing is completed, the tiny house is connected to the water source via water hose, and the new plumbing connections are tested for leaks.
Tiny House Rough-In Plumbing
Tiny house plumbing begins with the rough plumbing. Rough plumbing is completed before insulation and interior siding goes onto the wall.
For the supply rough-in, 1/2″ PEX is used. Larger 3/4″ PEX pipes can be used but 1/2″ pipes are sufficient for most tiny homes.
PEX is affordable, incredibly durable, easy to install, fix, and maintain. It also doesn’t require expensive tools and DIY-friendly. When compared to other piping materials such as copper and CPVC, PEX is the clear winner.
PEX Pipe 1/2 Inch
If you click this link and make a purchase, we earn a commission at no additional cost to you.

During the supply rough-in, you do not actually connect the PEX piping to the appliances and fixtures. The main reason is that you must put in insulation and interior wall before kitchen sink, bathroom sink, and the shower can be installed.
Understanding and installing PEX is pretty straightforward. All you need to do is watch a couple of YouTube videos.
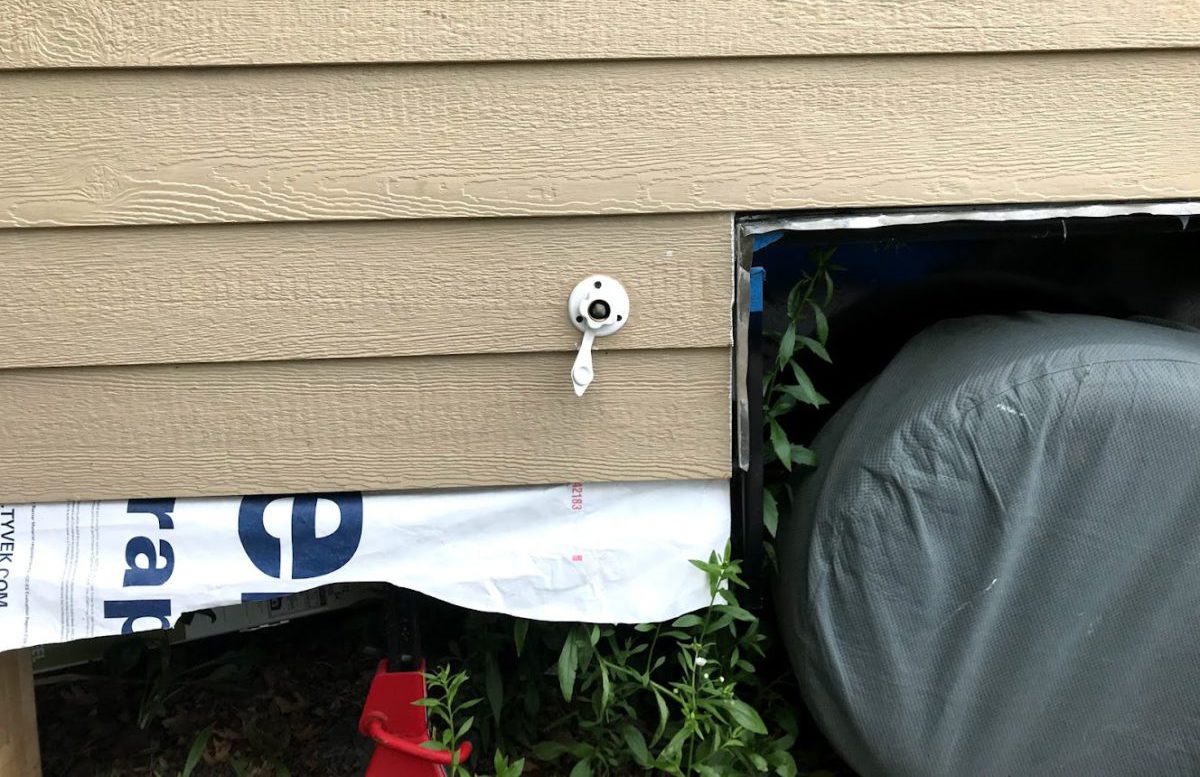
Install Tiny House Water Inlet
Most tiny houses will be plugged into city water via a water hose from the main house. To accept the city water, you need to install a water inlet.
Polar White City Water Flange
If you click this link and make a purchase, we earn a commission at no additional cost to you.

For our tiny home, we strategically placed RV Inlet near the kitchen and the bathroom so that we use the least amount of PEX and fittings as possible (mainly to reduce costs).
Location of the water inlet will depend on your preferences and there is no right or wrong answer!
First, wrap plumber’s tape around the inlet’s male threads. Using a set of wrenches, tighten a 1/2″ PEX Brass Adapter Fitting onto the threads. The fitting must be tight but not too tight to damage the threads.
Here is a quick tutorial on how to install plumber’s tape on brass threads as a refresher.
Proceed to cut a piece of PEX (2ft) using a SharkBite PEX tube cutter. Push the piece of PEX into the crimp fitting of the male adapter.
Place a PEX pipe crimp ring 1/8″ to 1/4″ away from the end of the PEX, proceed to crimp using a PEX crimping tool. Crimp until you hear a click. Use a Go/No-Go gauge to ensure that you crimped correctly!
Here is a quick tutorial on how to crimp a fitting and check for proper crimping.
Now, there is a reason why you must install this piece of PEX before you install the inlet. Mainly because it is impossible to crimp after the inlet has been installed since the crimping tool cannot reach the inlet from the back of the siding.
This is why we use a piece of PEX (2ft) long enough that we can it off to the desired length using a PEX cutter after installation.
PEX Crimping Tool with Go/No-Go Gauge
If you click this link and make a purchase, we earn a commission at no additional cost to you.

Finally, using a hole saw, cut out a hole big enough for the water inlet to fit. Fasten the inlet’s flange to the siding using exterior screws.
Seal the gap using spray foam and caulk around the inlet’s flange using 100% waterproof silicone.
Install a Water Pressure Gauge
This step is optional but highly recommended because a water pressure gauge can monitor the proper functioning of tiny house plumbing in real-time.
First, cut the supply line using a PEX cutter where you intend to install the gauge. Then, install a PEX tee fitting at that location.
Proceed to install a brass-to-PEX fitting onto the water pressure gauge using a plumber’s tape and a set of wrenches. Then, crimp on the pressure gauge assembly onto the tee fitting.
Water Pressure Gauge
If you click this link and make a purchase, we earn a commission at no additional cost to you.

Install a Supply Plumbing Manifold
With the water pressure gauge installed, you then need to create a plumbing manifold, a system that distributes incoming water to multiple supply lines.
The water that passes through the manifold will be routed to plumbing fixtures and appliances around your tiny home.
The simplest way to create the manifold is to branch off the main supply line whenever it needs to be rerouted using a PEX tee fitting.
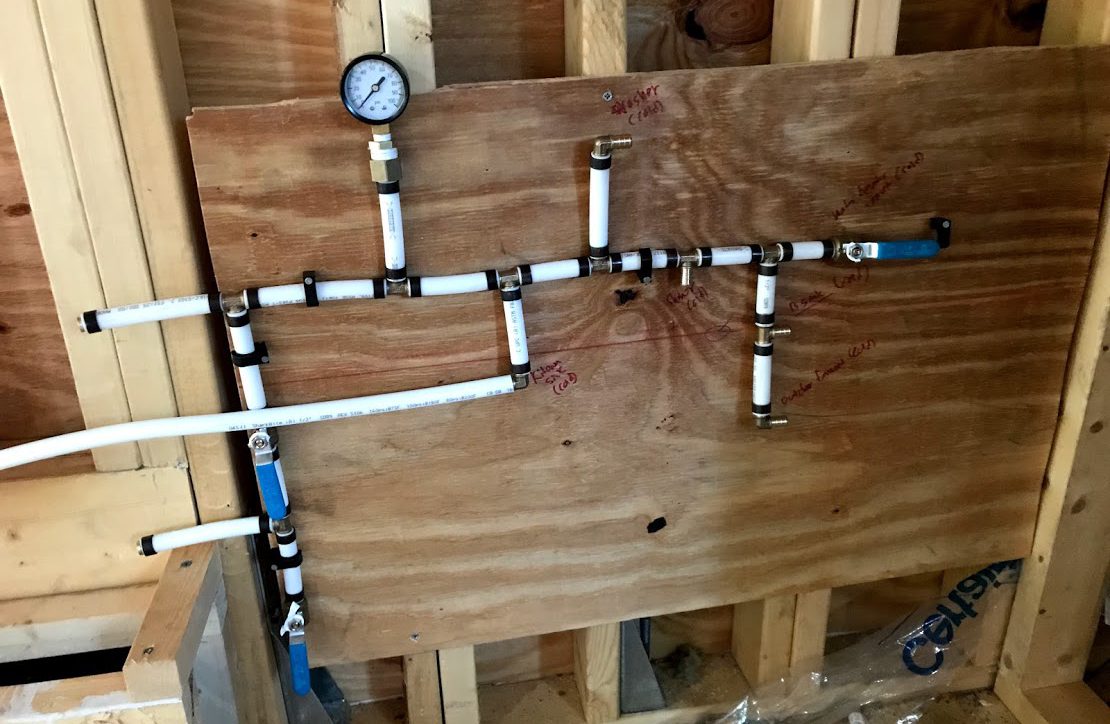
For my tiny home, I branched off from the supply line and dedicated each new line to the kitchen sink, bathroom sink, washer, outdoor faucet, shower, and water heater.
It is best to install the manifold on a piece of 1/2″ plywood and attach the manifold to the interior wall using interior screws.
Since the manifold typically has the most connection points, it is the prime spot for leakage in the future. By installing the manifold on the interior, we not only provide easy access to the manifold for maintenance but also prevents it from freezing.
The first shut-off valve you see above is the main shut-off valve for the tiny home. And the second shut-off valve is installed in case I want to install an indoor water filter.
Since I installed an outdoor inline water filter, two small PEX lines are installed around the second shut-off valve and capped. If you plan to do the same, the second valve is optional.
Install PEX Lines
PEX lines are installed between the center of the studs. To do so, use a 3/4″ augur bit and an impact driver to drill 3/4″ holes in the center of the studs where you plan on running the lines from the plumbing manifold.
To prevent yourself from accidentally screwing through the PEX lines when working on your interior, you need to nail safety plates over the studs where the pipes are located.
Dedicate one hole for each PEX line. Always make sure to not kink your PEX lines as you work around tight corners. To prevent this from happening, you must use 90 degrees PEX bend support whenever necessary.
Always leave enough PEX at the end of your runs to ensure enough PEX line when connecting lines water fixtures and appliances.
Based on my experience, it’s better to have leave excess than to run short of PEX.
Insulate PEX Lines
After PEX lines are installed and connections are crimped, you need to insulate your pipes. This prevents PEX pipes from freezing during the winter and water vapor from condensing around the pipes due to temperature differences between the pipes and the outdoor.
For this task, you can use foam pipe insulation to wrap around the supply lines. Cut these pipe foams to the desired length and insulate both cold and hot PEX lines.
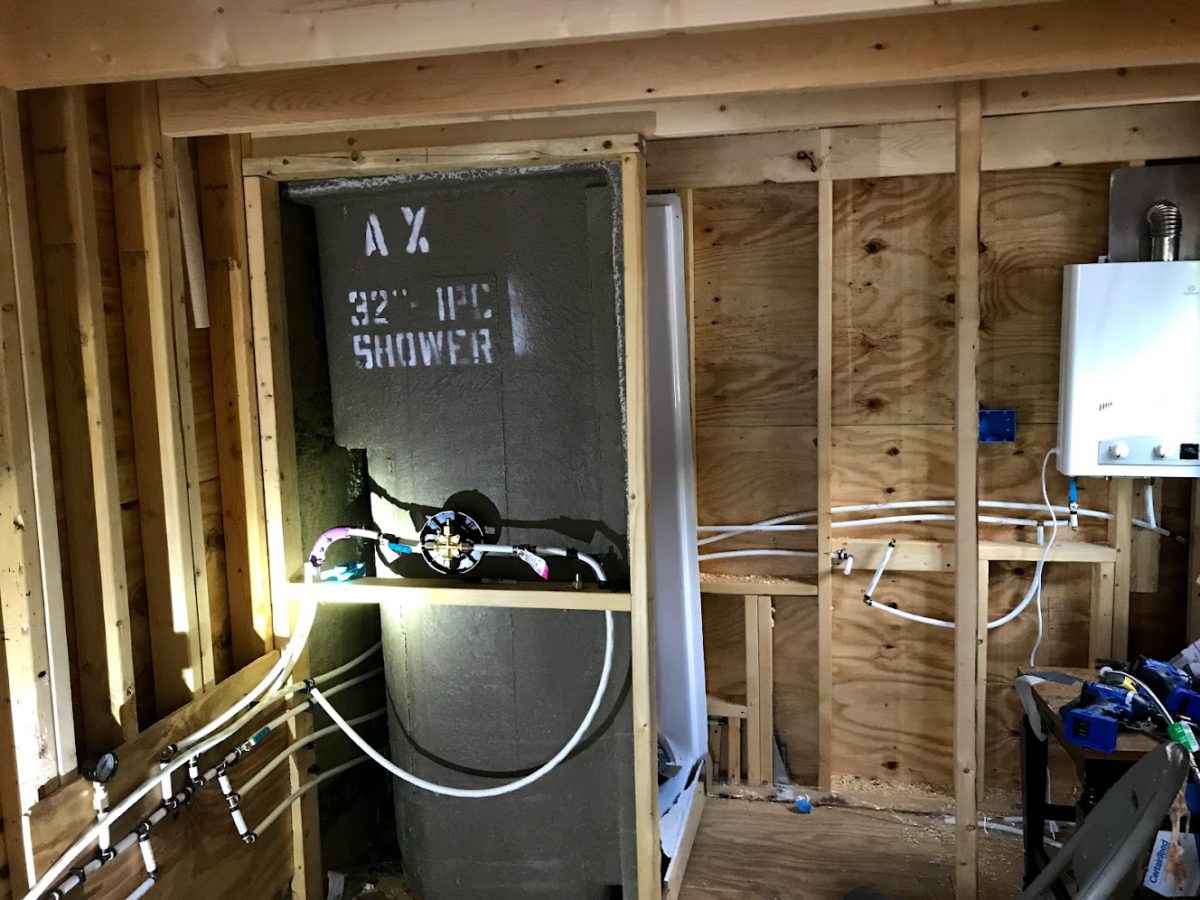
Install a Tiny House Water Heater
Tiny house water heater works by using electricity or gas to heat up the cold supply water. Therefore, it has a cold water inlet and a hot water outlet.
For our tiny home, we decided to install an electric tank water heater because it is cheaper than a tankless water heater while allowing us to not even bother with gas connections and potential gas leaks.
After purchasing a water heater, secure the water heater into place using a bracket that comes with the water heater. Then, install 1/2″ brass-to-PEX fittings onto both cold water inlet and the hot water outlet using a plumber’s tape and a set of wrenches.
Connect a dedicated supply line to the cold water inlet. Crimp. Connect another line of PEX onto the hot water outlet. Crimp. This line will be your main hot supply line that branches off to places that will need hot water, such as shower, sink, dishwasher, and washer.
Here is the water heater that I installed and the official instructions to go with it.
Mini Tank Electric Water Heater 4-Gallon 120V
If you click this link and make a purchase, we earn a commission at no additional cost to you.

Tiny House Drain Plumbing
Drain plumbing can be done either before or after you move your tiny home to the final parking spot.
Regardless of when you choose to complete drain plumbing, it must be completed after supply rough-in and after the interior work is finished. Make sure to install all cabinets and interior siding before moving onto drain plumbing.
Install plastic drain to kitchen and bathroom sinks
When installing drain lines, S traps or P traps are installed to prevent greywater smell from making its way into the tiny home.
These traps that are connected to the kitchen and bathroom sinks are made of plastic pipes (1-1/2″ or 1-1/4″ in diameter). You can cut and join these pipes using a rubber backing and a plastic nut that can be tightened using only your hand.
1-1/2" P-Trap with Threaded PVC Adapter
If you click this link and make a purchase, we earn a commission at no additional cost to you.

Since these traps do not experience high water pressure unlike the PEX pipes, it is enough to keep the water from leaking.
Now, to create a water-tight seal at the joints, you only need a washer, nut, and threaded ends where nuts can tighten into. This combination creates what is called a slip joint.
When installing slip joints, first insert the nut with threaded part facing up. Then, insert the plastic washer that is the same size as the drain pipe (1-1/2″ or 1-1/4″) as shown in the pictures above.
Push the plastic washer and the plastic nut to the threaded ends of the pipe. Then, tighten the nut onto the threads to create a water-tight seal.
Install the bathroom shower
For my bathroom shower, I bought an all-in-one shower stall. You can build a DIY tile shower stall. But I found this option to be more hassle-free and DIY friendly.
I have to admit. It doesn’t look STUNNING, but it is durable, water-proof, easy to clean & install, and affordable!
That being said, here’s how to install a fiberglass shower and a shower water valve.
Install the shower drain
Purchase a shower drain that fits your pre-fabricated shower stall. The shower drain has a PVC component (usually in 2″ diameter) that allows you to attach PVC drain pipe to the bottom of the shower drain.
For our shower stall, we used the Oatley no-caulk shower drain which has a 2″ PVC component.
PVC No-Calk Shower Drain
If you click this link and make a purchase, we earn a commission at no additional cost to you.

Prepping the subfloor for the shower waste line installation
Using a jigsaw or a hole saw, cut out a 2″ hole in your subfloor to allow the shower drain to fit snugly.
Using a 12″ metal drill bit, go straight through the middle of the hole you just cut out. Continue to go drill through the subfloor insulation until it goes through the subfloor flashing.
Then, go to the underside of the flashing and find the hole you just drilled. Using this hole as a center point, proceed to cut out a 2″ hole in the flashing using the hole saw.
Push the insulation away to make space for the drainage pipe that you will later install.
Install the drainpipe to the bottom portion of the shower drain
Cut out a piece of 2″ PVC long enough to go through the subfloor.
Connect the PVC pipe to the bottom portion of the drain by priming and cementing the connections. Push the assembly together, twist the pipe 1/4 turn clockwise, and hold it in place for at least 10 seconds for the chemical bond to form.
Here is an excellent tutorial on how to prime and cement PVC pipes together.
Oatley PVC Regular Cement and Purple Primer
If you click this link and make a purchase, we earn a commission at no additional cost to you.

Screw on the drain assembly to the shower stall.
Temporarily move the shower stall away from the drain hole. Drop the pre-assembled PVC and drain pipe through the hole.
Place the fiberglass washer (comes with the shower drain) on top of the drain. Gently lower the shower stall over the bottom drain piece. Make sure that the fiberglass washer stays on top of the drain as you lower the stall on top of it.
Place rubber washer (comes with the shower drain) on top of the shower stall opening and tighten the top drain piece onto the bottom drain piece.
Here is a quick video show you how the shower drain is installed.
Combine all the drains together
After installing all drain components, you need to combine them into a single PVC line that will direct dirty water away from the tiny house.
For bathroom and kitchen sinks, you need to use 1-1/2″ plastic drain to 1-1/2″ PVC drain adapter to connect your plastic drain to PVC drain pipes. For the shower, PVC drain is already used, so no adapter is needed.
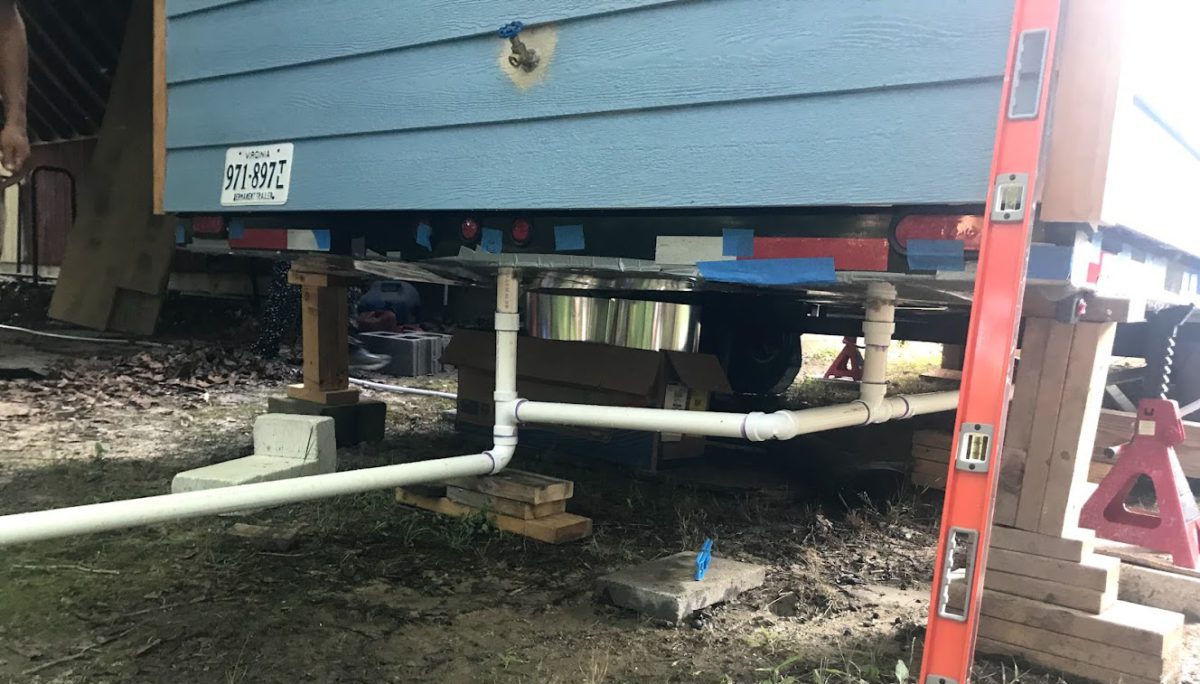
When bringing all the drain lines together, make sure to slope the main drain line to prevent standing water inside the pipes. For every 1ft of PVC, the pipes should drop at least 1/4 inch to create a constant slope down towards the ground.
Combining the drain lines took us only a couple of hours to complete. You will need to use a combination of adapters and connectors to accomplish this task.
Finishing touches
Once all drain lines are connected to a single drain pipe, we then connected two additional 10′ 2″ PVC pipes to extend the line. We did this to dump grey water as far away from the tiny home as possible.
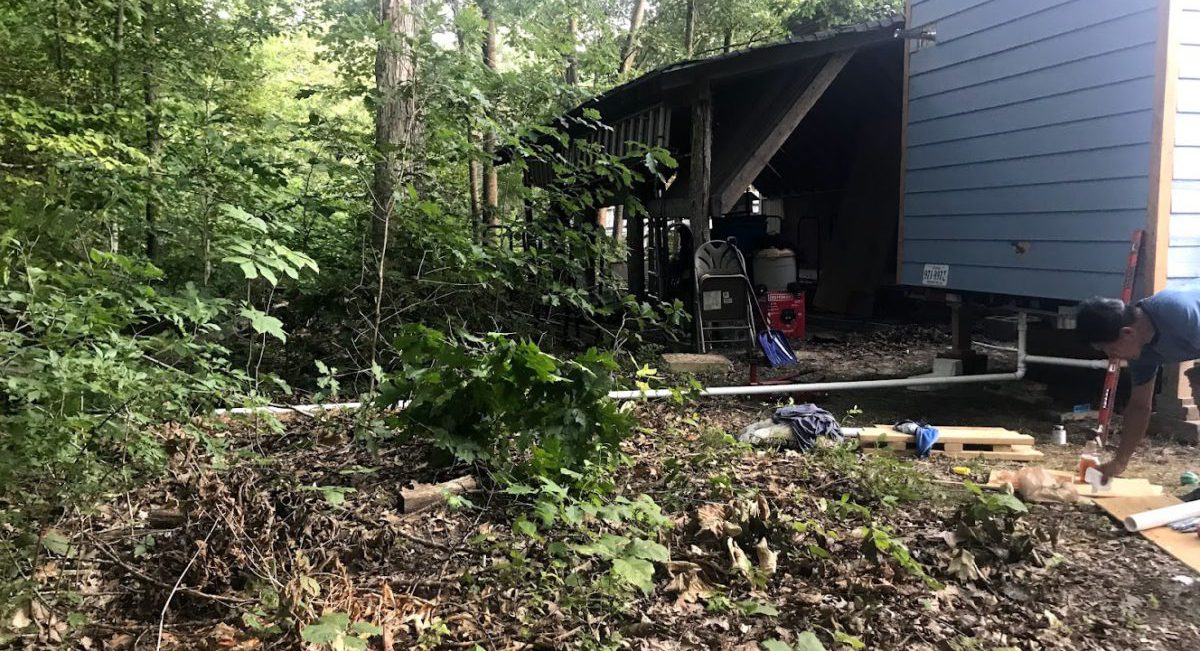
Since we didn’t plan on moving our tiny home for extended periods of time. We decided to use leftover 2×4 blocks to hold the PVC pipes in place.
If we have to move out of our current parking place for whatever reason, we will simply cut the pipes and reattach them once we relocate. We’ve actually done this when we moved recently and the process was super easy!
Frequently Asked Questions
There are three options when it comes to tiny house plumbing: PEX, Copper, cPVC. Due to ease of installation and durability, PEX is the most popular option when plumbing your tiny house on wheels.
Tiny house plumbing costs around $1,000 for a 24′ tiny home. Costs will vary depending on the size of your plumbing system and types of fixtures used.
No. Tiny house plumbing vent is only needed when connecting your tiny house to the sewer system. Since most tiny home folks opt for a composting toilet, you do not need to install a plumbing vent for your tiny home.
As discussed previously, there are three options, mainly PEX, copper, and cPVC. PEX is what we recommend!

Sang Kim is the founder of Riding Tiny® and has been active in the tiny house scene since 2018. Since then, his mission is to help people plan and build their dream tiny homes. And each year, he continues to help more people on the path to simple living and financial independence. Follow Sang's journey @ridingtiny
Get our FREE tiny house materials list to help estimate costs of your tiny home.
By entering your email address you agree to receive emails from Riding Tiny. We’ll respect your privacy and you can unsubscribe at any time.
Recommended Reading
How do you wire tiny house electrical? In this post, you will everything from tiny house electrical basics to wiring your home step-by-step.
The tiny house movement is here to stay. Learn everything you need to know about living in a smaller home.
Learn how to build a tiny house on wheels from scratch, step-by-step! Here, are all the resources you need to build yourself a tiny house.
Do you know how to level a trailer? Are you sure? Get perfectly leveled tiny home trailer by learning the know-hows in a few easy steps.
If you’re wondering how to estimate tiny house costs, wonder no more! It’s not as difficult as you may think!